Time for a another General d'Armee battle with four of us participating this time. Ion and Paul commanded the Austrians, and Andrew and myself the French.

Scenario
At the start of the 1809 campaign, Davout's III Corp was out of position and a portion of this Corp clashed with the Austrian IV Korp at the Battle of Teugen-Hausen. In a "what if" variant of this circumstance, I instead line up Davout's entire Corp against the Austrian II and III Korps in an encounter battle between these roughly equal forces. The points using the General d'Armee List Creator are about 5000 per side.
The Austrians in this scenario have twice as many artillery as the French, but their command is poor and they are lacking in light troops. The French while low on artillery, have excellent command and a great number of light troops. Both sides have similar numbers of cavalry.
For this game, things are "bathtubbed" to make things a little more manageable, with each unit representing a regiment of two or more battalions/squadrons rather than a single battalion/squadron, and each pair of guns representing two batteries. Each "Brigade" in GDA terms is thus a Division.
For this game, things are "bathtubbed" to make things a little more manageable, with each unit representing a regiment of two or more battalions/squadrons rather than a single battalion/squadron, and each pair of guns representing two batteries. Each "Brigade" in GDA terms is thus a Division.
French have 20 infantry regiments, 4 artillery, and 7 cavalry.
Austrians have 18 infantry regiments (all but two being large), 8 artillery, and 6 cavalry.
Austrians have 18 infantry regiments (all but two being large), 8 artillery, and 6 cavalry.
Victory Conditions
Both sides have similar objectives - take strategic positions around the central crossroads and press the enemy. Points are scored for the following and whoever has the most points when the game ends wins.
- Each enemy Division destroyed is 1 point
- Each built up area held is 1 point, holding the enemy baseline built up area is 3 points
- Committing any reserves is negative 1 point
Game Length
The game is 12 turns, but from turn 10 the game ends start of each turn on a die roll of 5-6 due to severe thunderstorms (such thunderstorms ended the battle of Teugen-Hausen).
FRENCH Forces
All French Divisional Commanders are Excellent (free reroll if Hesitant result).
1st Div Morand: Veteran Legere, 4 Ligne, 5 Skirmisher, Battery
2nd Div Friant: Veteran Legere, 4 Ligne, 5 Skirmisher, Battery
Light Cavalry Jacquinot: 2 Campaign Chasseurs
III Corp Davout - Right Wing, Gudin and St Hiliare : 4 ADC's (Me)
3rd Div Gudin: Veteran Legere, 4 Ligne, 5 Skirmisher, Battery
4th Div St Hiliare: Veteran Legere, Veteran Ligne, 3 Ligne, 5 Skirmisher, Battery
Light Cavalry Pajol: 2 Veteran Hussars, 1 Campaign Chasseur
Reserve 2nd Heavy Cavalry, St Sulpice: 2 Veteran Cuirassiers (Large), (+1 ADC)
AUSTRIAN Forces
II Korp - FML Kolowrat-Krakrowsky: 3 ADC's (Ion)Advance Guard FML Klenau : Jager, Line Infantry (Large), Uhlans, Dragoons, Cavalry Battery
1st Div FML von Brady: 2 Line Infantry (Large), 2 Skirmisher, Battery
2nd Div FML Weber von Truenefels: 3 Line Infantry (Large), 3 Skirmisher, Battery
III Korp - FML Hohenzollern-Hechingen: 3 ADC's (Paul)
Advance Guard FML von Vukassovich: Grenz, 2 Veteran Hussars*, Cavalry Battery
1st Div FML Lusignan: 3 Line Infantry (Large), 3 Skirmisher, Battery
2nd Div FML St Julien: 3 Line Infantry (Large), 3 Skirmisher, Battery
Grenadier Reserve: 3 Veteran Infantry (Large), (+1 ADC)
Cuirassier Reserve: 2 Veteran Cuirassiers, (+1 ADC)
Artillery Reserve : 2 Position 12pdr Batteries
*One extra Hussar regiment attached for scenario balance reasons.
Game
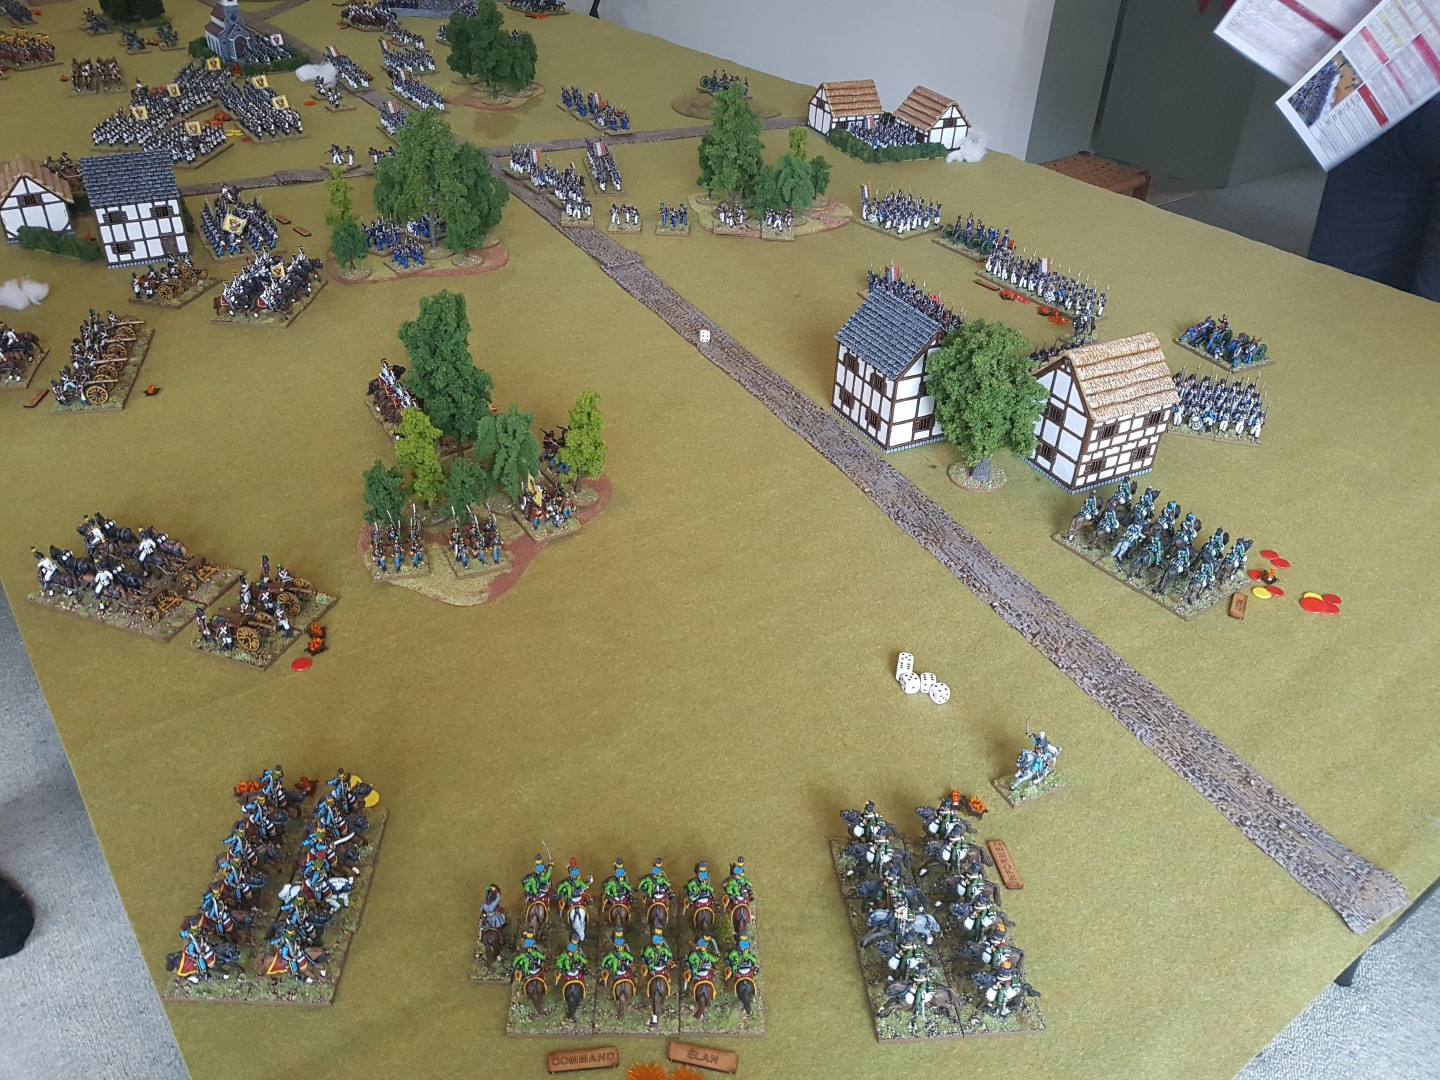
I set up the table the evening before the game, ready for a morning start the next day. Here's the starting positions, looking down the table. Reserves are still off table.

View from French side.

View from Austrian side.

Remaining pictures were then taken from the other end of the table and the Austrian side - to make better use of lighting during the day.
The battle opens with French seizing the initiative and 1st and 4th Divisions on each flank surge forward ("Forwards" orders) to occupy the central church and village.


One of the central Austrian Divisions is hesitant, but the divisions to their left act aggressively with cavalry moving up to counter the advancing French infantry.


And on the Austrian left wing, French infantry forms square as it is charged by Austrian Uhlans. The Austrian Uhlans retire and the square is pounded by artillery and becomes unformed with heavy casualties. Nearby French infantry lose fire discipline and casualties as they fire ineffectively at Austrian skirmishers in the woods in front of them.

The Austrian cavalry retire to reform after their charge.


Austrians close towards the churchyard.

French Chasseurs charge the Austrian column on the left, unforming them prior to contact, but retiring after a short and indecisive engagement.


More French Cavalry advance towards the Austrian left...

And charge again! The Austrian Cavalry is part of a hesitant Division and cannot assist their infantry by intercepting. But the Austrian infantry holds once more, and the French Hussars retire before contact.

Austrian infantry is ordered to charge the churchyard, but they think better of it and halt to deliver a volley at the defenders rather than closing to melee.

On the Austrian right flank, the Austrians are finding it difficult to use their artillery advantage effectively due to terrain and position.


On the Austrian left flank, the French infantry defending the churchyard flees as Austrian Cavalry artillery inflicts casualties and panic...


And Austrian infantry reforms ready to attack the churchyard once more.


The large Austrian regiments can take much punishment and dish it out, though hordes of French skirmishers are everywhere vexing.

Austrian Uhlans charge again, catching a French infantry regiment in line and running them down...

...then charging on into the French Chasseurs...

...dispersing them too!

But on the Austrian right they are hard pressed, with an Austrian line regiment dispersing from attrition.

Back on the left the Austrian cavalry charges onwards into the now hesitating French Hussars.

Dragoons rout one Hussar regiment, and charge on again running down the second French Infantry that has just been tumbled out of the churchyard! The other French Hussars manage to fight off the Uhlans causing them to finally retire however.

French form hasty squares and the artillery starts withdrawing, and the now unsupported and outnumbered Austrian Dragoons retire for now. Still the Austrian cavalry have destroyed three French regiments and badly damaged another in this charge, for little cost to themselves.

Austrian Grenadiers arrive to bolster the centre attack.

But on the Austrian right flank, their 4th Division has taken heavy losses, retreats and then disperses.

The French Chasseurs on this flank are led in a glorius charge by Jaquinot. The Austrian Hussars are forced back and their supports move to assist.

The Austrian Heavy Artillery also arrive on their right, but likely too late to do anything other than stall the French advance now.


The Austrian left flank situation.

The Austrian Dragoons charge again and force back the French Hussars. Both French Hussar units are now near breaking.

Austrian Grenadiers form for an attack in the centre, the massed columns taking heavy casualties from artillery. I also run out of casualty markers and have to add various tokens to indicate them - which means over 150 casualties are distributed over the various formations still engaged in battle!

The cavalry on the right flank swirl about taking heavy casualties and exhausting each other.

Austrian Grenadiers break through the French centre. Two French regiments are sent into headlong retreat with a third about to disperse.

But turn 12 has arrived with the thunderstorms and the battle is over just in time to save the French right wing. French scrape through to a win holding three built up areas and having dispersed one division for four points. Austrians hold two built up areas but have committed their reserves and have not managed to disperse any enemy divisions, so only have one point.
Austrian dispersed regiments. All of 4th Division lost, plus a Hungarian regiment and many skirmishers.

French dispersed regiments, two line, Chasseurs and skirmishers. The Austrian cavalry were responsible for the loss of the two line regiments and Chasseurs.

Not shown by these lost regiments is the high number that were very close to breaking, particularly from the French right wing which would likely have broken if there was even one or two more turns! Probably close to 200 casualties were distributed among the various formations involved by the end, and many units on both sides were close to dispersing from attrition.
Conclusion
A hard fought game, with the number of regiments actually dispersed a little misleading given how exhausted and close to breaking many formations were. The French right wing was saved by thunderstorms from imminent collapse, as all three divisions there were about to be unavoidably demoralised due to losses. The situation on the left looked better for the French as far as I could ascertain. In a multiplayer game one tends to get a little myopic and focused on ones own area of the battle though, which for me was the French right wing/Austrian left.
In terms of game balance, rating all the French commanders as excellent (free reroll if hesitant) was a strong advantage for the French , as were the extra ADC's. Checking the overall scenario, the French had about a 5% points advantage, and also the advantage of being able to allocate 1-2 ADC's to the initiative roll, and 1 skirmisher base per 24 rather than per 36 figures. They also had three rather than one division in reserve, and placement of built up areas was slightly more favourable for the French.
These advantages for the French were something I allowed because I had in mind (perhaps wrongly) that Austrian artillery dominance would likely force the French into the attacking role, which would be more challenging. As it turned out though, the Austrians had difficulty making the most of their artillery superiority, in part because they went on the offensive quite early themselves! This paid off in places of course, such as the spectacular Uhlan and Dragoon charge on their left flank, and capture of the churchyard. It was less successful on their right though where there was more of a bottleneck. I suspect just having more equal forces would have been fine given the command challenges for the Austrians in particular.
The most important thing of course is that lots of Napoleonic troops battled away for a day! Ion and I started at about 10:30 and were joined by Andrew and Paul about midday. We had finished 12 turns by 18:30, which is not bad considering we were rusty or still novices with the rules! It was Andrew's first game, Ion and Paul's second, and my third. The General d'Armee playsheets are very helpful. It seemed that most of the rules could be worked out using these, with only some of the more complex charge situations requiring reference to the rulebook.
Lovely game, Mark!
ReplyDeleteWhat was the table size, and how many castings fought it out?
Thanks Peter! 6'x12' table and about 1500 figures.
DeleteThanks to you, Mark. I had a thoroughly enjoyable day, with Hexahedra, the Goddess of Wargames dice smiling on me most of the day. The Merveldt Dragoons and their accompanying Dragoons deserve a battle honour for their achievements.
ReplyDeleteOne thing: I never realised how close the French right wing was to breaking. It was clear they were taking a lot of stick, but there seemed always to be plenty more where they came from. At the time, I thought the on-table game balance slightly in the French favour - especially once they seized the central villages. But the preponderance of reserves ought probably to have redressed that, give or take the VP cost. Imagine if the grenadiers had come on at the first, instead of the fourth, attempt!
Thanks for the logistic support as well. You must tell me where you get your olives!
Thanks Ion, yes a few changes in timings could have made a big difference! Cheers!
DeleteAwesome! Great scenario, beautiful troops and thematic beer! Love it!
ReplyDeleteThanks Jay, yes the 1812 beer Andrew supplied was just the thing!
DeleteThe game is excellent! Exciting action! It is a pity that the Austrians lost in the battle. Our group with the next game begins to test the rules of the Army General from Brown. It is very useful to read the reports of battles on these rules.
ReplyDeleteThanks Dmitry, I look forward to seeing your GDA reports and thoughts on them!
DeleteSpectacular and very impressive battle, sounds great with some heroes of the day such as the Austrian Uhlans!
ReplyDeleteMany thanks Phil, yes the Uhlans led the way for sure!
DeleteWhat a wonderful looking battle Mark and very entertainingly written up and photographed. Sensational collection of figures mate and great to see the GdA out again. I very much enjoy these rules myself and your “bathtub” OOB has given me some very interesting ideas. Well done indeed!
ReplyDeleteThanks Carlo, I look forward to seeing more GDA on your own blog!
DeleteBrilliant to see the toys out on the table knocking each other over. These rules are still our "go to" Napoleonic set. Have a great year old chum. Best wishes, Jeremy
ReplyDeleteThanks and happy new year too Jeremy, looking forward to seeing some more reports on your site! :)
DeleteYou set an impressive table, Mark; highlighted by your beautiful collection. My eye is immediately drawn to your lovely, yellow-faced uhlans. Gorgeous color. It would have been great fun to participate in this spectacle.
ReplyDeleteWell done!
Thanks Jonathan, yes they stand out with that colour! Cheers.
DeleteThose austrians sure took a pounding
ReplyDeleteYes they did indeed, thanks Francesc!
DeleteAnother marvellous report, very inspiring. Keep them coming!
ReplyDeleteThanks John!
DeleteLooks excellent!
ReplyDeleteCheers Paul!
DeleteFantastic looking game, brilliant looking troops!
ReplyDeleteBest Iain
Thank you Iain! :)
DeleteHi Mark.
ReplyDeleteLooks like I missed a fabulous game. Congrats to you on such a spectacle.
You can count me in for next one.
Chris
Cheers Chris, yes a fun time was had :)
DeleteSo next one.....
ReplyDeleteYep will have to have another one sooner this time. :)
DeleteGreat looking game Mark and, with 1500 figures on the table, one in the grand manner. It must have been nice to see the Austrian horde, the fruit of your recent labour, on the table.
ReplyDeleteCheers Mark, yes though only about half the Austrian infantry on the table in this one :)
ReplyDelete