Friday 25 January 2019

French vs British After Action Report

Time for some more annual leave and Napoleonics, with a Divisional level action between some British and French. Local wargaming buddy Matt has been hard at work and has finally got a sizeable initial British/Allied force together and ready for action. Many pictures of his lovely lads in this report!

A look at some of the British/Allies. Matt has a clean bright style that looks great on the wargaming table. and he seems to be able to pump out the units quickly too! He's painted about five 28mm ancients ADLG armies over the past couple of years, and now these too!

British Line.

Highlanders, and Rifles (the latter coming with their own portable orchard!)


Prussians

British foot artillery
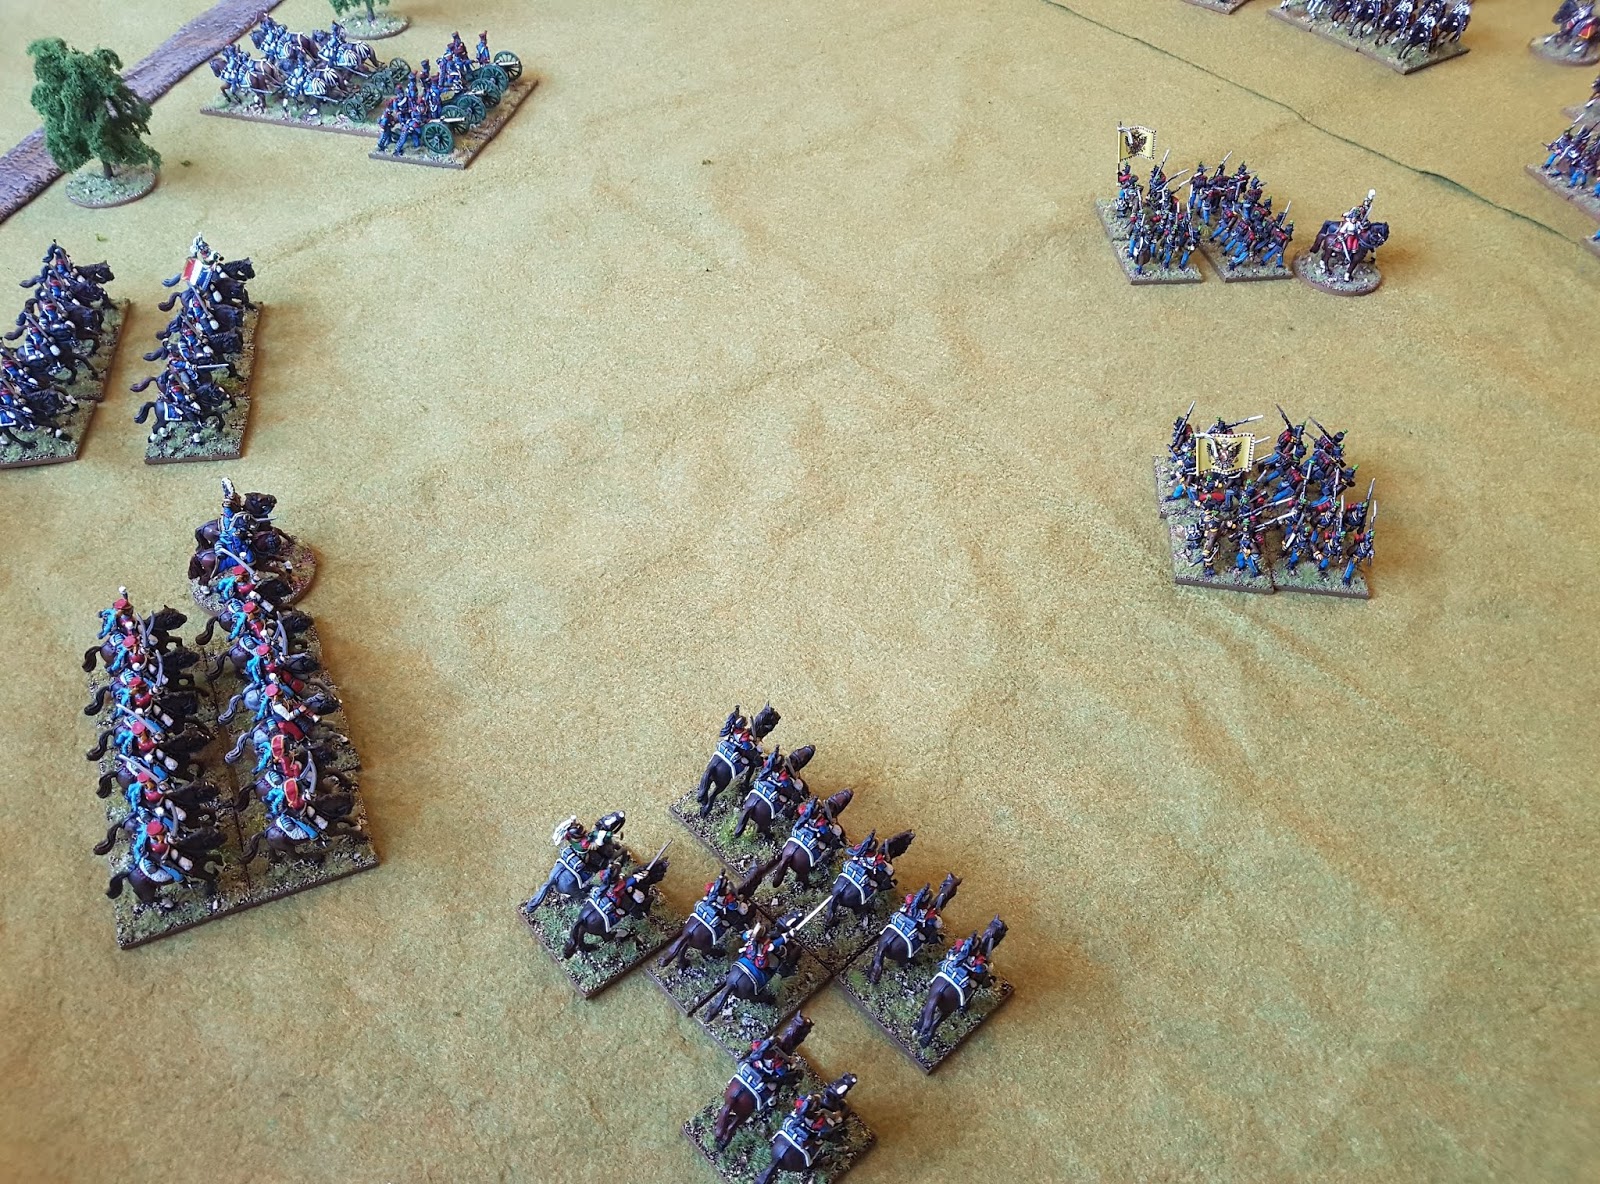
Dragoons.


Hussars and Light Dragoons.


Nice job on the Army Commander stand, with tiger skin on the ADC.


More pics of the Brits in the game report, so onwards!


Game

Forces were as follows, and we used the 321 fast play rules for this game, both sides being about 600 points. All generals were competent rating.

French
1 Veteran Light, 3 Regular Line, 4 Skirmishers
3 Regular Line, 4 Skirmishers
4 Raw Line (recent Conscripts)
2 Regular Cuirassiers, Horse Battery (2 guns)
2 Regular Hussars, Horse Battery (2 guns)

British
3 Regular Line, Foot Battery (2 guns), 5 Veteran Rifle Skirmishers
2 Veteran Line (Highlander), 5 Veteran Rifle Skirmishers
4 Regular Line (Prussian)
2 Regular Line (Brunswick) 
3 Veteran British Heavy Cavalry
2 British Light Cavalry, Horse Batter (2 guns)


Setup below. French have five Brigades on table, one in reserve (Infantry), and have first turn. British have four Brigades on table and two off (Brunswickers and Light Cavalry).

Here's the French centre/refused right. Hussars and Infantry.

The French left, Conscripts and Cuirassiers!


French waste no time advancing to take the ridges and villages.


Veteran Lights (converged Carabiniers) rush down the road hoping to reach the second village before the British 


Most British Brigades are initially hesitant, further handing initiative to the French. The British Light Cavalry are ordered on from reserve on their left flank though.  The French reach the second village and occupy it.

Horse artillery deploys and targets the oncoming Prussians.

Here come the British Light Cavalry.

French Hussars redeploy to the right flank to counter the British cavalry.


Prussian attack columns approach the central ridge.

And more Prussians assault the Carabiniers in the village (who had also managed to take out the too close British gun section with garrison fire!). First round is a drawn combat with both sides taking two disorder hits, so both sides keep fighting.

British Light Cavalry sweeps around the French right.

The British Heavy Cavalry charges the French left flank, and the Brunswick Brigade arrives to backup this attack. 


The Lifeguards rout the first Cuirassiers, but initial pursuit takes them just short of their next target where they take a brutal round of canister and musketry in the French turn, before running down the Horse Artillery the following. The other Dragoon and Cuirassier fight is a bloody draw with both sides rendered combat ineffective and removed by end of two rounds of melee.  The French have entirely lost their Cuirassier Brigade. 

British Line join the assault and take the village, with both the Prussians and French Carabiniers being lost.

Prussian Infantry attack stalls  in the centre...


...as another Prussian battalion is lost and the Brigade as a whole entirely disperses as the remaining two battalions fail their morale checks.


More Hussars, plus Horse Artillery and Infantry break the British Light Cavalry Brigade. Two British Brigades down.

Brunswickers charge and rout a French Conscript unit, and the remaining Conscripts form line to try and stop them. The Brunswickers have taken some disorder and if they lose a unit the game will be over for the British due to half of their Brigades being lost. But one more loss will also break the Conscript Brigade.

Reserve infantry arrives for the French, enough to form square and stop the victorious British Heavy Cavalry running amok on this flank but not in time to bolster the Conscripts.

Only just surviving massed musketry and closing fire, the Brunswickers attack column charges the next conscript unit, doing three disorder hits and taking none in return. The conscripts need to roll a 1 to hold and do so! 

With attached General waving his hat furiously, another conscript unit charges the flank and things look grim for the Brunswickers! Amazingly they just manage to survive and rout the Conscripts to their front.

And some grey horsed heroes arrive and the Brunswickers are saved just in time! The remaining Conscripts flee.


Meanwhile in the centre, Highlanders charge and break another French line.

But are stopped by the second line, and then charged in the flank and routed by another French infantry unit.

Just a gratuitous limber photo to break the narrative...

French Hussars press the British left flank attack back, but Highlanders and Artillery form a solid counter as the Rifles fall back.

And my right flank Infantry Brigade which has been taking attrition all game finally breaks under fire from British Rifles and Musketry. With that I've lost three Brigades and the game!


British Rifles, how I hate thee!


Conclusion

An exciting game that was on a knife edge by turn 5 for the British and turn 6 for the French, with a single disorder hit on British or French right flanks being enough to win the game, and both sides striving to deliver the knockout blow.  Doesn't get closer than that! 

I should also mention this is actually the second game we played, as I accidentally deleted the photos of the first while tidying up and deleting thousands of photos (doh!). The first game was a handy British victory, this second game was much closer.  Matt's already planning substantial expansions to his force, so bigger battles and some multiplayer ones are on the horizon. Looking forward to it. :)

Another test of the 321 rules too, and I take it as a good sign that players like Matt who are new to the rules, but not new to Napoleonics, can just leap into the game using familiar tactics and come out on top.

Friday 18 January 2019

Painting review for 2018 - year of pants...

Here's the review of my 2018 painting. A rather meagre total of 416 28mm figures for the year, with 130 cavalry and 286 infantry completed. Not much compared to the 1000+ figures of previous years.

First reason for this is that I spent a lot of free time playing games rather than painting, with Ancients and Sci-Fi as well as Napoleonic games seeing the table.  So fair enough perhaps.

The second reason was pants - Hungarian pants. I painted 200 pairs of Hungarian pants with their thrice damned knots in 2018, and I now have over 400 of them total. I've committed to never painting any more! Then there were the Hussars, Uhlans and Command figures, many of which were quite individual and had much time consuming lace and other detail to paint.

Additionally there were 28 Galatians notable for their lack of pants, and clothing generally...

So all up not a great tally, but at the same time I'm glad to have these troublesome units behind me. Plus I consolidated my terrain collection with some much needed hills, templates and fortifications  for historical scenarios, and made a bunch of casualty markers, so not dissatisfied!

Austrians
32 Austrian Generals and Staff (and more rebased)
24 Cuirassiers, 24 Dragoons and Cheavauleger
36 Hussars
12 Uhlans
60 Grenz
72 Hungarians
42 Hungarian Grenadiers


French
24 French Generals and Staff (and more rebased)
54 French Voltigeurs (+ another 36 rebased)

Terrain and stuff
Casualty Markers
Hills and Templates
Gabion Fortifications (can be seen in this battle report)

Ancients
28 Naked Galatians

Sci Fi
30 Sci Fi Scouts (no picture)

Monday 14 January 2019

Blog update and Napoleonic rules uploaded

My Chasseur Napoleonic blog has grown considerably since I first started it in late 2013. The index of labelled posts to the right is now quite cumbersome, which will only get worse as further topics are added. It's time to take command and reorder matters!

I've added some index tabs across the top to increase the ease of navigating the site content. I'll admit this is not just pure altruism for visitors, but also so I can find things more easily - most typically painting posts so I can remind myself what colours to use! As time passes I'll add more links to these indexes, and a longer term goal is better quality photos.

Additionally, I've added a page and uploaded the "321 - Fast Play Napoleonic Rules" as promised in my previous post, along with some design notes and variants.


Friday 4 January 2019

Battle of Caldiero 1805 - Battle Report

The Battle of Caldiero. 2800 28mm figures on a 16'x6' table, good company,  warm weather and beer,  and a day of glorious wargaming in the grand Napoleonic style. Here's the report!


Scenario

I used Michael Hopper's scenario from his book "Rise of Eagles", changing only a few details. Firstly I used slightly fewer but larger units of infantry, in order to keep the battalion and brigade frontages and troop densities correct (i.e. my battalions are 24 figures with 8" frontage in line, whereas the scenario specifies infantry with 6" line frontage). Cavalry units represent 400-500 men, infantry 600-800. Each side has about 50'000 men.  Unlike later, according to the scenario Austrian battalions were not bigger than the French ones at this time. The formations listed below are Brigades or Divisions. 

Secondly, the scenario length was reduced to 9 turns rather than 12, and reinforcements were to come on proportionately earlier. This is because I was using faster play rules with more time and action each turn. 

After some discussion we rated all Austrian generals as competent (second highest rating) on the Austrian side, (though I thought about making some cautious), and all French were strategists (highest possible rating, possible levels for commanders in rules used is Incompetent, Cautious, Competent, Strategist). The French Cuirassiers were rated as veteran, all other cavalry on both sides as regular. French horse and heavy artillery was also rated as veteran. The Austrian Grenadiers (17 units of them!) were all veteran as were French units noted as being veteran in list below. Reflecting early Austrian inflexibility their veteran units couldn't change formation and move in the same turn in this early period according to the scenario book, but French ones could.  A further rule to reflect linear tactics from early Austrians (such as all units in a Brigade having to be in same formation as per GDA) wasn't used, but they were all in line anyway excepting a couple of Grenadier units near the end.

For the Austrians Paul was Archduke Charles (Austrian left wing) and myself Simbschen (Austrian right wing), while Ion was Massena (French right wing) and Andrew Molitor (French left wing).

Figures

As described in the previous Austrian and French deployment posts, these 28mm figures are mostly later period (1809 onwards) so shakos rather than raupenhelms and bicornes for the infantry! The main issue I had was a lack of Grenadiers, so Hungarians and Grenzers were honorary Grenadiers for this game. Blue trousers or a bearskin means veteran! Also two of the Light Cavalry on each side were Hussars rather than Chasseurs/Chevaulegers, though these are both identically rated light cavalry types in this scenario, so a cosmetic difference. Guard Chasseurs were also used for one of the Chasseur units in Espagne's division, rated as regular rather than veteran - heresy I know!

Rules

I decided to use some homebrew fast play rules that I've been playing around with for this one, which turned out to be a good choice I think. Game was large with close to 3000 figures on the table, but over in 5-6 hours. I'll also post a copy of the rules soon for any interested.

Austrian Army (See Austrian Deployment)

Right wing -  Simbschen (right to left):
Kottulinski: 6 Line, 1 Skirmisher, 1 Foot Artillery
Michalowich: 6 Line, 1 Skirmisher, 1 Foot Artillery (3 line infantry arriving turn 5)
Soudain: 6 Line, 1 Skirmisher, 1 Foot Artillery 
Croll: 6 Grenadiers, 1 Heavy Artillery (Hungarians representing Grenadiers)

Left wing - Archduke Charles (right to left):
O'Reilly: 4 Hussars
Wetzel: 6 Line, 1 Skirmisher, 1 Foot Artillery
Kalnassy: 6 Line, 1 Skirmisher, 1 Foot Artillery, 2 Lancers
Colloredo: 4 Grenadiers, 1 Heavy Artillery (Grenzers representing Grenadiers)

Reserves (center and left wing)
Lorraine: 4 Dragoons (Turn 1 onwards)
Lipper: 3 Grenadiers (Turn 5 onwards)
Hohenlohe: 4 Grenadiers, 2 Hussars (Turn 7 onwards)

French Army (See French Deployment)

Left Wing - Molitor (left to right)
Launay: 6 Line, 3 Skirmisher, 1 Foot Artillery
Valory: 6 Line, 2 Skirmisher, 1 Dragoon
Lenchantin: 4 Line, 1 Hussar, 2 Skirmisher, 1 Veteran Horse artillery

Reserves (Turn 1 behind Valory): Espagne: 4 Chasseurs 1 Veteran Horse artillery
Reserves (Turn 1 behind Lencahntin): Valentin: 3 Veteran Line

Right wing - Massena (left to right) 
Compere: 3 Veteran Light, 2 Line, 1 Skirmisher, 1 Veteran Heavy Artillery, 1 Sapper
Camus: 3 Veteran Light, 2 Line, 1 Skirmisher, 1 Sapper
Goulos: 4 Line, 1 Hussar, 2 Skirmisher, 1 Foot Artillery

Reserves (Turn 1 behind Camus and Golous): Lacour: 2 Dragoon
Reserves (Turn 1 behind Compere): Solignac: 2 Veteran Light, 2 Veteran Line, 2 Line, 1 Dragoon, 1 Veteran Horse Artillery

Reserves (Turn 1 anywhere between Valory and Goulos)
Lacour: 2 Cuirassier, 1 Veteran Horse Artillery


The Game

Here's the setup the night before...


And the morning, the French start their attack!


The French begin pounding Caldiero with fire, disordering the garrison. And the Austrians immediately start moving their Lancers and Hussars to reinforce their left wing.


The French attack draws closer...

Historically the French held back on their left wing, but there is none of this here, up the slope come the French assault columns! The Austrian artillery wreaks havoc on the advancing French and their left most column is the first unit to break and be removed.

Panning across to the left.


Charles and staff watch from just behind Caldiero.

Another French battalion disintegrates under canister fire as it attempts to assault the position battery in the Austrian centre.

And two more French assault columns manage to charge the first Austrian line. Austrian Grenadiers deliver a close volley and break the first column but suffer some disorder. To their right neither side gains an immediate advantage but both units are mauled and combat ineffective by the end of the fight. 

The first cavalry charge is launched on the French right, with Dragoons charging Austrian infantry which form square and repel them. The French begin their assault on Caldiero but fail to take any of it in the initial assaults despite some imposing Sappers leading the way.

Austrian Uhlans force back the French Skirmish line, and the Austrian Dragoon Division arrives to bolster the Austrian left. The first half of Caldiero is taken by the French, though their casualties are mounting.

On the right, the first Austrian line has disintegrated from repeated assaults and no chance to relieve them, but a second and third line are ready to reinforce.

Canister fire has been raking down the French in swathes here, but a column of French infantry manages to come up over the rise to their right and assaults the guns before an Austrian battalion charges their flank and sees them off.

Another Dragoon charge on the French left, dramatically riding down the Austrian position battery which mistimes its canister fire, and then charging on and breaking a Grenadier square against all the odds! (About a one in a hundred games event, as compared to the far more likely demise of Dragoons trying this - so not something to rely on!)

The French continue their attack on the Austrian right, but Valory's Division has broken, the first French formation to break.

The French player is well refreshed and full of confidence though so the attack continues!

Austrian Uhlans catch a French unit in line and ride them down before being repelled by a square as they charge on. Meanwhile the French heavy cavalry is moving to mount a coordinated attack on this flank. 

The Austrian right, French Dragoons charge up the hill and and are repelled by a square, but the disordered Austrian artillery to their right is overrun by Chasseurs and lost.

And French reserve Grenadiers overrun the Austrian position battery here too. These Austrian guns had caused much carnage and destroyed two battalions with canister but are now lost.

More French Grenadiers smash through the Austrian defenders on the road, while combined French battery fire suppresses the Austrian artillery here.

On the Austrian left, four French heavy cavalry units charge the Austrian Hussars.  One French Dragoon unit is lost, and the other heavies spent for now, but the Austrian Hussars are badly mauled and their Division quits the field.  The first Austrian Division lost.

Combat everywhere, and the Austrians still just holding on in Caldiero!


Charles anxiously surveys the scene with French breakthroughs either side of his position!

The Austrians have just lost four cavalry units this turn, but they have another six on this flank and two more in reserve! And the French infantry brigade of Goulous here finally takes too many casualties and breaks, making it two French formations down.

The French right flank cavalry takes a breather, but keeps the isolated Grenadiers on the Austrian left pinned in square and targets for the French horse artillery. Unable to stand this fire, Colloredo's Grenadier formation is finally broken, though the remaining Grenadiers staunchly refuse to retreat. Two Austrian formations broken.

As Simbschen, I am alarmed to see the French seem to be breaking through the Austrian centre, though they are paying dearly for every pace of ground.

Plentiful Chasseurs keep the Austrians on their hill and cautious on my right.

On the Austrian left their cavalry is at least pinning French infantry in square vs the Austrian guns!

French Hussars manage to run down the disordered Austrian artillery battery in the centre, and then a line infantry unit. Just behind them Caldiero finally falls to the French after two more Austrian units are forced out, and Kalnassy's formation breaks! Three Austrian formations down.

 French Horse artillery has raced up and unlimbered in the centre too...

And Wetzels formation now breaks under fire with all remaining units fleeing. The  road is open for the French, and the Austrians have now lost four formations.

But at last the Austrian Grenadier reserves arrive! Lippers formation first, but hesitantly and not moving quickly enough to try and retake Caldiero!

Austrian Dragoons take revenge on French Hussars before being seen off by a square, but the French Horse Artillery nearby is also lost in another charge, and so Lechantins formation is lost. Three French formations down.

On the right remaining Austrian artillery finally takes its toll and Launay's division breaks. Four French formations broken.


But French volley fire in the centre finally breaks Croll's Grenadiers too, so that is now five Austrian formations lost...

...and the battle is over! French hold Caldiero and have broken more formations than they lost (5-4) so a major French victory!

Left of the field.


The centre.

And the right.

 Defence in depth on the Austrian right but not where it mattered!

The mutually shattered centres...

Plentiful Grenadiers and cavalry for the Austrians, but not hitting fast enough.

A look at the Austrian left flank at end of the game.


Caldiero, full of French in the end!

The Austrian staff decide dusk is time for a tactical withdrawal!


Losses

Casualties - Austrians...


French casualties... mainly from Launay and Valory.


Conclusion

A great game! The French managed to wreak havoc on the Austrian formations, while largely preserving their own strength (except for their left flank infantry!). With the Austrian Grenadier reinforcements the alternative French victory objectives (clearing the central road or second level hill on the Austrian right), seem incredibly difficult to take, so holding Caldiero and aiming to win the battle of attrition was the right idea I think.

Thanks to Paul, Ion and Andrew, and to readers for having a look at this post! :)