Here's a report of a small Napoleonic encounter, using modified Blackpowder rules. The scenario was the prelude to the Battle of Eckmuhl, on 21st April 1809, where Davout's IV Corp attacked Rosenberg's III Corp. It was loosely based on a scenario published in Wargaming Soldiers and Strategy Magazine Issue 2, (available as PDF here).

This was a Corp level game, but with units representing regiments of 2-3 battalions rather than individual battalions. For Blackpowder purposes Austrian Generals were all Leadership rating 8 (average). I made Davout a 10 (excellent, because he is Davout), and other French Generals 9 (good). The French have two more infantry units and better command than the Austrians, but the Austrians have a defensive position that the French must bust them out of to win. We rolled for sides and Paul ended up with the French while I commanded the Austrians. The force lists were as follows:
AUSTRIANS - IV Corp
Headquarters - Rosenberg
1x Line Infantry
1x Artillery Reserve (12 pdr)
1st Division- Somarvia
1x Light Infantry - Grenz
1x Light Cavalry - Chevauleger
1x Light Cavalry - Hussar
1x Light Cavalry - Chevauleger
1x Light Cavalry - Hussar
2nd Division - Dedovich
4x Line Infantry
1x Artillery (6pdr)
3rd Division - Hohenlohe
2x Line
1x Artillery (6pdr)
FRENCH - III Corp
Headquarters - Davout
1st Division - Friant
1x Light Infantry
4x Line Infantry
1x Artillery (8pdr)
2nd Division - Saint Hilare
5x Line Infantry
1x Artillery (8pdr)
3rd Division - Montbrun
1x Light Cavalry - Chasseurs
1x Light Cavalry - Hussar
1x Horse Artillery
Setup
Here's the battlefield setup, on a 8x6 foot table. The church is centre of a valley between two hills (formed here by hulking clinical psyc textbooks stuffed under a mat-of-war cloth which worked a little better than I thought it would!). There are three separate built up areas along the road that are held by Austrians at the start of the game. To win the French must capture all the wooded areas, and one of these built up areas. Or alternatively either side wins if it demoralises the enemy force.


The bulk of the Austrian force is on the centre and left flank, and their right (top of photo) is very exposed.


The French have two large infantry divisions advancing, with a cavalry regiment on each flank.


The Battle
The battle begins. The 1st French Division rolls well for command and immediately assaults the right flank defence. The initial assault is held, and the French continue the attack.

The 2nd French Division advances to the edge of the hill on their side of the valley.

Austrians respond with the Light Cavalry redeploying to the right flank to prevent any breakthrough by the French infantry. Reserve artillery moves to redeploy.

2nd Austrian Division advances in rather plodding Austrian fashion to form a defensive line, with Grenz moving to occupy the woods.


The assaulting French infantry unit is shaken and disordered but refuses to break.

At last the French prevail with all their supporting units, and French infantry occupies their first objective.

Disappointingly the Austrian cavalry fail to charge given they outnumber the French cavalry here.

The rest of the Austrian army has now formed a respectable defensive line though.

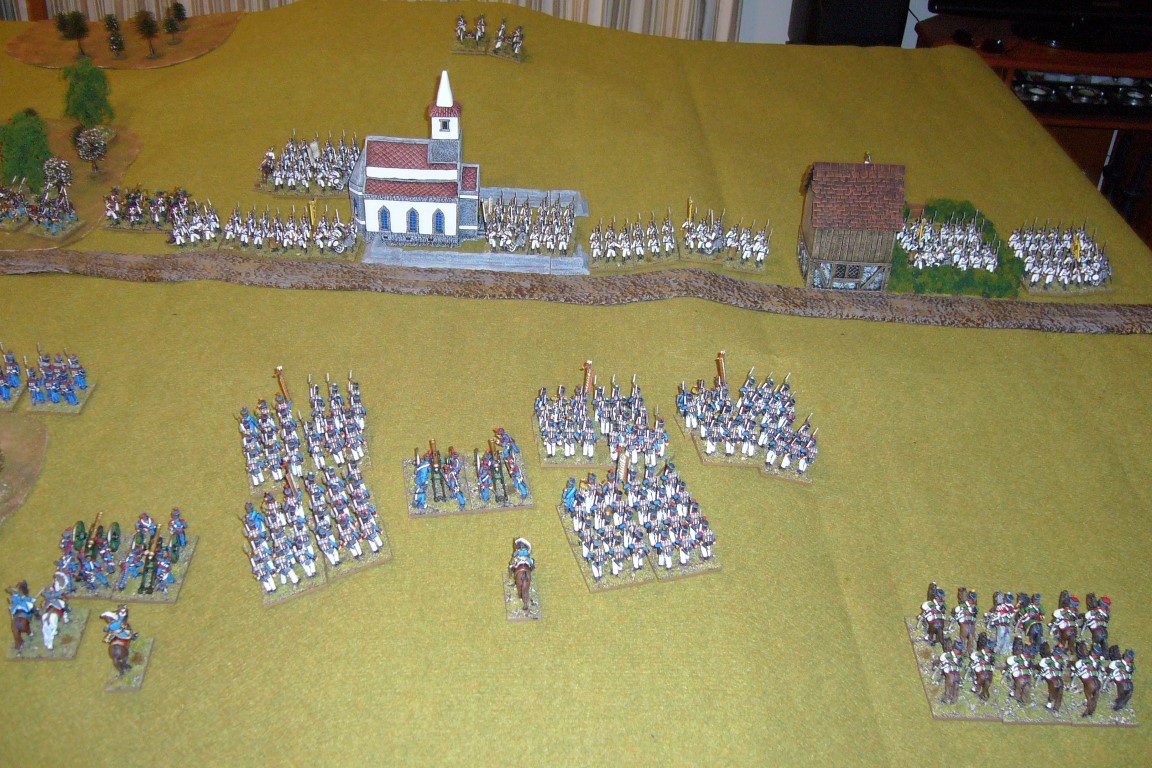

The French 2nd Division assaults either side of the church with two assault columns. Seems like a tough ask but Paul is pretty keen on the bayonet so in they go.

Here the French have a harder time of it, due to greater numbers of Austrians, and less supporting French.

The French force back the Grenz out of the woods.

Having failed to charge last time, the Austrian Hussars again fail to charge and instead blunder forward disastrously into most inopportune circumstance...

An Austrian infantry unit and artillery battery from 2nd Division are overrun near the church, though not before a shaken French line regiment also breaks under cannister fire.

The Austrian Hussars take a volley in the flank and are disordered, and are lucky not to suffer a worse fate, (and in fact I think we forgot to apply enfilading fire here).

On the Austrian left the other French assault column is thrown back disordered and shaken, but the Austrians are also shaken. (The little blast markers are hits, 3 hits being enough to have a unit shaken).

On the right my Austrian Hussars recover from disorder (something they can do on a 4+ during command phase due to Elite ability), and charge the French Hussars. The French initially get the better of it and force the Austrians back, but then the next round (fought in same turn) is a draw, with the French retiring disordered and shaken, and the Austrians retiring shaken.

The retiring French infantry on the Austrian left receives multiple volleys in the back and breaks. My Austrians are badly shaken and in no position to follow up the success though.

Rosenberg rallies the Grenz and they form a new line at the rear woods in the Austrian centre. The Austrian Hussars break though, being shaken and coming under musketry fire from the built up area to their front.

The French 2nd Division is quite beaten up and forms a new line on their side of the valley being content to exchange fire and use their artillery superiority to good effect.

The Austrian Generals attempt to rally their men, but under both musketry and artillery fire the shaky Austrian 2nd Division breaks and with it the Austrian army. Well done to Paul!


Conclusion
We both enjoyed this little Blackpowder affair, with the rules giving a very active and quick flowing game. It easily reached a conclusion, even with Paul and myself being very rusty on the rules and having to look things up a fair bit. The game involved all arms and situations, including fighting in built up areas and woods so it was a good rules revision scenario. Factors are few and easy to remember.
One could perhaps modify all distances to two thirds or half or something similar if using regiment or brigade level units rather than battalions. Or you can just "bathtub" units if one wants to keep the same distances as we did here. We both thought the musketry range rather excessive, but maybe it works given large move distances and the fact that "hits" are just a reflection of general stamina and morale rather than casualties. I.e. having a unit puffing smoke and noise and an occasional casualty at you continuously is still quite unpleasant even if it's beyond effective range for causing substantial numbers of casualties. I know some groups do choose a smaller musketry range though.
In terms of the game itself, Paul's aggression and good command rolls meant the Austrians were already under severe pressure on their right flank from the very first turn. The French infantry regiment fighting for the town (other regiments acting as supports) performed stoically, taking heavy casualties from closing fire and melee and passing at least three break tests before the Austrians failed and broke on their first test. The Austrian cavalry managed to redeploy rapidly to prevent any breakthrough, but then they and the rest of the Austrian force were disappointingly but predictably plodding for the rest of the game. Only one command blunder occurred, by the Austrian Hussars, but then they heroically fought their way out of it so can't really hold it against them! I stupidly lost an artillery battery by advancing it too far forward. It would have been much better off positioned and firing from the hill at the start, aiming to disorder the French attack columns. All in all Paul did things better than I did and deserved to prevail.
Historically I understand the Austrians managed to hold until nightfall around 2100, the first time the Austrians had managed to hold a French attack in this campaign. Some additional context I didn't factor into this game was that artillery ammunition supply was problematic for both sides, and the French attack only started mid-afternoon so they were under time pressure (not that I think either of these factors would have changed outcome of this particular game).
Unit Ratings – French Grande Armée
Unit Ratings – Austrian Army
Unit ratings
By request, here's ratings we used for units in Black Powder.
Unit Ratings – French Grande Armée
· All infantry have the “Must Form Square” rule
Unit
|
Type
|
Armament
|
Hand-to-Hand Dice
|
Shooting Dice
|
Morale
|
Stamina
|
Special
|
Line Infantry
|
Infantry
|
Muskets
|
6
|
3
|
4+
|
3
| |
Légère
|
Infantry
|
Muskets
|
6
|
3
|
4+
|
3
|
Skirmishers
|
Marine Infantry
|
Infantry
|
Muskets
|
6
|
3
|
4+
|
3
|
Elite 4+
|
Polish Infantry
|
Infantry
|
Muskets
|
6
|
3
|
4+
|
3
|
Brave, Elite 4+
|
Provisional Inf
|
Infantry
|
Muskets
|
6
|
2
|
4+
|
3
|
Poor Drill, Unreliable
|
Hussars
|
Cavalry
|
Swords
|
6
|
-
|
4+
|
3
|
Elite 4+, Marauders
|
Chasseurs
|
Cavalry
|
Swords
|
6
|
-
|
4+
|
3
|
Marauders
|
Lancers
|
Cavalry
|
Lances
|
7
|
-
|
4+
|
3
|
Marauders, Lancer
|
Dragoons
|
Cavalry
|
Swords
|
8
|
-
|
4+
|
3
|
Heavy Cav +1
|
Cuirassiers
|
Cavalry
|
Swords
|
9
|
-
|
3+
|
3
|
Reliable, Heavy Cav +D3
|
Foot Artillery
|
Artillery
|
Cannon
|
1
|
3-2-1
|
4+
|
2
| |
Horse Artillery
|
Artillery
|
Light Cannon
|
1
|
3-2-1
|
4+
|
1
|
Marauders
|
Old Guard Inf
|
Infantry
|
Muskets
|
7
|
3
|
3+
|
4
|
Reliable, Elite 4+
|
Middle Gd Inf
|
Infantry
|
Muskets
|
7
|
3
|
4+
|
4
|
Reliable, Elite 4+
|
Young Gd Inf
|
Infantry
|
Muskets
|
6
|
3
|
4+
|
3
|
Reliable, Elite 4+
|
Grenadiers à Cheval
|
Cavalry
|
Swords
|
10
|
-
|
3+
|
3
|
Reliable, Elite 4+
Heavy Cav +D3
|
Guard Dragoons
|
Cavalry
|
Swords
|
9
|
-
|
3+
|
3
|
Reliable, Elite 4+
Heavy Cav +1
|
Guard Lancers
|
Cavalry
|
Lances
|
8
|
-
|
3+
|
3
|
Reliable, Elite 4+,
Lancer, Marauders
|
Chasseurs à Cheval
|
Cavalry
|
Swords
|
7
|
-
|
3+
|
3
|
Reliable, Elite 4+
Marauders
|
Guard Artillery
|
Artillery
|
Cannon
|
2
|
3-2-1
|
3+
|
2
|
Reliable, Elite 4+
|
Guard Horse Artillery
|
Artillery
|
Light Cannon
|
1
|
3-2-1
|
3+
|
1
|
Reliable, Elite 4+
|
Unit Ratings – Austrian Army
· All infantry have the “Must Form Square” rule
Unit
|
Type
|
Armament
|
Hand-to-Hand Dice
|
Shooting Dice
|
Morale
|
Stamina
|
Special
|
Line Infantry
|
Infantry
|
Muskets
|
6
|
3
|
4+
|
3
| |
Jager / Grenz
|
Infantry
|
Muskets
|
6
|
3
|
4+
|
3
|
Skirmishers
|
Hussars
|
Cavalry
|
Swords
|
6
|
-
|
4+
|
3
|
Elite 4+, Marauders
|
Chevauleger
|
Cavalry
|
Swords
|
6
|
-
|
4+
|
3
|
Marauders
|
Dragoons
|
Cavalry
|
Swords
|
8
|
-
|
4+
|
3
|
Heavy Cav +1
|
Cuirassiers
|
Cavalry
|
Swords
|
9
|
-
|
3+
|
3
|
Reliable, Heavy Cav +D3
|
Foot Artillery
|
Artillery
|
Cannon
|
1
|
3-2-1
|
4+
|
2
| |
Horse Artillery
|
Artillery
|
Light Cannon
|
1
|
3-2-1
|
4+
|
1
|
Marauders
|
Grenadiers
|
Infantry
|
Muskets
|
7
|
3
|
4+
|
4
|
Reliable, Elite 4+
|


