Time for some more Napoleonics. To the Peninsula, January 16th 1809, with the British defending a ridgeline and their embarking forces - fleeing Spain and the advancing French. Marshal Soult arrrives with three divisions to try and prevent their escape!
Scenario
This scenario was a playtest version kindly provided by Michael Hopper, who will be familiar to many of us for his excellent Napoleonic scenario books covering 1805 and the 1809 Danube Campaign.
He has been hard at work on some new Peninsula scenario books (see flyer at bottom of this post!), and wanted some feedback on his Corunna scenario. I readily agreed to give this a try! As with previous Michael Hopper scenarios, a detailed force list is avaiable including units and strengths on the day. This makes it easy to convert it to whatever ruleset you favour, and Michael was particularly keen to see this played with different rulesets. We gave this a try with the 321 Quickplay ruleset.
Time of the battle in the scenario was listed as 2:00pm to 5:20pm with variable game length. With each turn in 321 rules being at least 30 minutes, we decided on a seven turn game, going to eighth turn on a die roll of 4-6 at end of seventh turn, and ninth turn on roll of 4-6 at end of eight turn.
Time of the battle in the scenario was listed as 2:00pm to 5:20pm with variable game length. With each turn in 321 rules being at least 30 minutes, we decided on a seven turn game, going to eighth turn on a die roll of 4-6 at end of seventh turn, and ninth turn on roll of 4-6 at end of eight turn.

Forces
I usually play regimental level, but for this we went with a batttalion level action with each unit representing about 600 men, 800 for larger units, and over 1000 men for the two British Guards. There were some slight adjustments to numbers of units to make sure overall troops ratios were equivalent on both sides. E.g. Some smaller French units were combined into larger ones - mainly the 8 incredibly weak battalions of the 47th and 122nd of Gaulois, which were combined into 4 regular sized units.
The two forces are roughly equal in numbers at about 17 000 men each, but the British have a few good quality units, and the French a few poorer quality ones. The French have over twice as many guns, though the British are able to use a reverse slope position to avoid fire from these! The artillery is also basically immobile, being dragged into position on difficult hills before the battle. Neither side has cavalry available in this scenario, due to exhaustion and terrain being unfavourable.
All commanders were rated as Competent, as I was not aware of any particularly brilliant or poor individuals amongst them and the scenario did not specify otherwise.
Also we did not use the "British Line" national characteristic in this scenario. So British shooting in line (Guards and Veterans excepted), was no better than the regular French units. This was because we did not think this would be justified at this time, and it would also give a big advantage to the British in a scenario which is already a rather tough proposition for the French.
Miniatures Note: I used some of my Bardin era French. Matt used his 1815 British, and being a younger chap still early in his Napoleonic career with only a thousand or so figures painted ;), had to add in a couple of Brunswickers, some Russians and even the odd Austrian Skirmisher to make up numbers! Most architecture is also not particularly Spanish of course... forgive the representations!
FRENCH FORCES (Marshal Soult): 4 x Batteries, three Light units also have a Sapper base added.
Merle
Reynard: 3 Light, 2 Line, 1 Recruit Line, 1 Skirmisher
Sarrut: 3 Light, 2 Line, 2 Skirmisher
Mermet
Lefebre: 3 Line, 1 Skirmisher
Gaulois: 2 Line, 2 Recruit Line
Delabourde
Foy: 3 Light, 2 Line, 1 Skirmisher
Arnaud: 3 Line, 1 Skirmisher
BRITISH FORCES (General Moore): 1.5 Batteries (With Baird)
Baird
Warde: 2 Large Guard Line (6 bases each)
Bentinck: 1 Veteran Large Line (42nd, 5 bases), 2 Line, 1 Skirmisher
Manningham: 3 Line, 1 Skirmisher
Hope
Leith: 3 Line, 1 Skirmisher
Hill: 3 Line, 1 Large Line (5 bases), 1 Skirmisher
Craufurd: 1 Veteran Large Line (92nd), 2 Line, 1 Skirmisher
Paget
Anstruther: 1 Large Light (5 bases), 1 Line, 1 Large Light Rifles (95th, 5 bases)
Disney: 2 Line
The Battle
Below shows the situation at the end of the first French move.
The British forces have Baird on the left below, Hope on the right, and Paget in reserve.
French from left to right are Mermet, Reynard and Delabourde.
The scenario lists some starting orders for units, but for purposes of rules here, the only restrictions on movement would be caused by failed command checks (which did end up causing some problems at times, particularly on the French right flank where Soult's reroll was not available due to his supervision of the left flank).
Incidentally, historically further north (towards top of the photo), there were more French forces (mainly dragoons), and another British Division (Fraser) who were in a stalemate due to terrain. I.e. the cavalry couldn't advance because of the terrain, but the British infantry still needed to guard against them. Consequently Michael Hopper left these out of the scenario which seems a reasonable choice to me.

Historically it seems the French advanced in two lines all across the front, attempting to apply a lot of pressure around the village of Elvina (middle left of picture) and the end of the ridge, to try and envelop the British line. The French artillery are unable to fire on the British due to them sheltering just behind the ridgeline. Historically the British contested Elvina (worth a victory point at the end of the game if the British hold it), but Matt wisely avoids this for now and hides behind his ridge!


A view from the British position. In the foreground Paget's Division advances to reinforce the centre , Light Infantry and 95th Rifles. (Historically they went to the British right).


The French advance up the ridge and a firefight erupts across the entire line for several turns, with spent units being retired and fresh units being committed to replace them.

Gaulois Brigade loses two units in a bruising encounter with the British Guards, and the remainder seek to retire to safety. British Artillery are pushed forward and finish off this retreating Brigade with some long range fire, turning the retreat into a rout.

On their right, the French charge the weakened British line, forcing them back, but unable to break them!

More spent units are withdrawn from the line and fresh units sent forward, in a deadly battle of attrition.

In the centre the 95th rifles are committed, and charge downhill breaking through two units of Reynard's Brigade and killing Reynard himself! However the now disordered Rifles have overextended themselves, and are in turn broken by massed artillery and musketry before they can retire.

On the French left, the British Guards, Lights and Highlanders rebuff any French attack, and French throw forward a skirmish screen to cover their own retirement from this flank.


Turn 9 and the battle is over! Final positions below.

Casualties for the British - 95th Rifles, and a unit each from Manningham and Leith, and some skirmishers.

French losses, rather heavier! Galouis' Brigade is broken, Reynard has suffered heavily losing 3 units (plus Reynard himself), and a unit from Sarrut is also lost.

Two victory conditions are offered in the book. The first is breaking Divisions (which would result in a draw), and the second is Breaking Brigades (which would result in a a major British victory). Overall we agree it seems reasonable that the British have come out better here!
Conclusion
I haven't played Corunna before, but this seems a reasonable representation of it to me judging from what I've read. The French have a kind of insurance policy that if they are hard pressed they can retire back and have the protection of their guns, but they have no advantage in the head to head fight over the ridge. The British Guards are particularly fearsome, and as the French it was real struggle to make any headway anywhere. Of course, historically the French were "rebuffed at every point" so that is likely as it should be!
I would likely have been better to attempt some earlier charges against British units suffering disorder, as that payed some dividends later, but such a tactic can also go horribly wrong very easily! Every French unit was also kept in line given my caution, but a few attack columns in the right places could have helped achieve some more decisive attacks (one way or the other anyway!).
I would likely have been better to attempt some earlier charges against British units suffering disorder, as that payed some dividends later, but such a tactic can also go horribly wrong very easily! Every French unit was also kept in line given my caution, but a few attack columns in the right places could have helped achieve some more decisive attacks (one way or the other anyway!).
As for a game, well this is Napoleonics with no cavalry, and almost no artillery (given terrain effects), and limited frontage for the attack (also due to terrain effects). It's a good position the British have chosen. This means it's a straight up attritional infantry grind, where you are attempting to create some weak points and then hopefully exploit them. With a little more boldness on the part of the French I might have had more success, but I think it is a tough ask. The victory conditions encourage the British to hide on the reverse slope, as they don't lose any points if they avoid contesting Elvina. From a tactical perspective I'm not sure why they did actually try to contest Elvina - it seems like a bad and unnecessary idea to me with all that French artillery, and historically General Moore was killed by artillery in that area leading the 42nd...
Anyway, I find historical scenarios interesting to try regardless of balance, so am easily satisfied in that regard! It gets the thumbs up from me for being clear and adaptable scenario, and easily modifiable should you wish to. For a more even game, perhaps make Elvina worth a point to whoever holds it at the end of the game? Though I'm not sure what historical justification for that would be other than the fact that the British did contest it!
Lastly here is a flyer of the first two (of four) Peninsula books by Michael Hopper, with ordering details. Based on strengths of the last five books, I'll definitely be getting these!

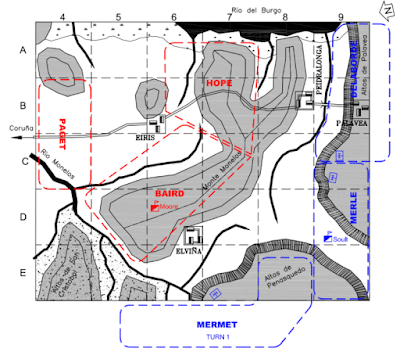
Here's a reduced scale example of the maps you get in the book, this one for this battle of Corunna.
Each square is 18" in 28mm, or 12" in 15mm. For 28mm we trimmed the map slighlty smaller (e.g. several inches to remove the impassable going on the Western (top) flank here, as this does not materially impact the battle. The important thing is to approximately replicate the vital tactical features of the battlefield.
Nice report on what looked like a great contest. Lovely looking troops and terrain and as you say, from the little I know of Corunna, this sounds like it came out about right!
ReplyDeleteMany thanks Ross, yes quite a different sort of fight this one!
DeleteSpectacular and superb!
ReplyDeleteThanks Phil!
DeleteWonderful AAR and photos. Thank you for sharing
ReplyDeleteThank you Doug!
DeleteExcellent stuff, Mark! Having games Corunna in both board game and in miniature, For me, it would be helpful to see the scenario map so I could get my bearings on scope of scenario. I enjoy Hopper’s books and will likely add these to my shopping list. I have playtested a number of Hopper’s scenarios from earlier books but none from these primarily due to COVID.
ReplyDeleteThanks Jonathan, scnenario map added above for your reference!
DeleteThanks for your playtesting on earlier books too :)
Thanks for including the map! That helps.
DeleteMy Napoleonic gaming group was having a discussion on Monday night about potentially playing more scenario-based games as a change from the usual points-based encounter games we play. We have done Talavera, Albuera and Saalfeld, so something like this would be worth a look.
ReplyDeleteThansk Lawrence, yes scenarios are a lot of fun, even the smaller ones are worth playing :)
DeleteAlmost like being there! Great stuff.
ReplyDeleteMany thanks! :)
DeleteSpectacular battlefield! Methinks this scenario is a tough assignment for the French, even more than it was historically!
ReplyDeleteThanks Ion, yes it's rough alright! :)
DeleteA fab looking game with lovely figures and interesting scenario!
ReplyDeleteThanks Dmitry! :)
DeleteLooks good. It played out pretty close to the real thing aside from not contesting the village. The nature of the action makes it a bit less interesting (as you say it's mostly a straight up infantry fight), but there will be plenty of diverse action in the 2 books, and I will certainly be adding them to my collection, too!
ReplyDeleteThanks Peter, and yes I think there will be a lot of value in those 2 (4 eventually!) books.
DeleteLovely looking game and a historical result, can't be bad!
ReplyDeleteBest Iain
Thanks Iain, I agree!
DeleteAn excellent looking game Mark and a most interesting report of it. The density of troops and terrain make manoeuvre difficult, so it's an 'infantry bash', as you note. Lovely stuff!
ReplyDeleteRegards, James
Yes thanks James, a different sort of battle indeed!
Delete